| A) Photoshop Workspace - Menu bar - You guys must probably already be familiar with the menu bar from other programs. This runs across the top of your Photoshop window, and contains various menu options for Photoshop's tools. There too many option for me to explain. I’m sure you guys will familiar with it later.
- Options bar - The options bar sits under the menu bar and holds contextualized options for different tools. It also contains the workspace menu, where you can save.
- Tool bar – This toll bar is sits to the left of your Photoshop window, and contains shortcuts to Photoshop tools.
- Document window - Each open document has its own document window with a status bar along the bottom. This window is your work preview.
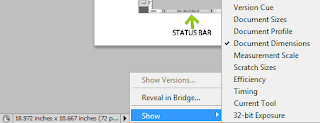
- Status bar - The status bar sits to the right of the zoom percentage displayed in the bottom left-hand corner, and displays information that's specific to the document. You guys also can use the workspace area. It sit on the top right window.
- Panel dock - Contain many options like swatches, style, character, paragraph and others.
B) Customizing your Workspace You guys can customize your Photoshop workspace to suit you or your project. You guys also can use the default standard workspace. Almost everything within your workspace can be repositioned and reconfigured. You might choose to customize your workspace by: 1. Changing the look of the menu bar - You can change which menu items are visible in your menu bar, and even add color to your menu items. If you wanted, you could also assign new or different keyboard shortcuts to menu commands (which I don't recommend until you feel very comfortable with Photoshop). Go to Edit > Menus and use the dialog box to modify the menu bar and palette menus.
2. Moving the options bar - If you want to move the options bar, you can do so by clicking on the handle on its left side and moving it around. The options bar will "dock" to the top or bottom of the screen automatically if moved near those areas.
3. Moving the tool bar - The tool bar is extremely portable, and can be moved to any location on your screen. Move the tool bar by clicking on the light gray area at the top of it and dragging it around. You can switch between different tool bar layouts by clicking the double arrow along the top of the toolbox.
4. Rearranging panel dock - There are many ways to rearrange your panel dock. You might want to separate a palette from its palette group, and move it into another group. You can do this by dragging the palette tab out of its original group and into the new group. You may want to expand or collapse a dock, by clicking on the double arrows at the top of the dock. You might also decide to drag some of your palette tabs out of their dock, and close the rest. To display a palette that has been closed, go to Window and select the palette you want to show.
5. Displaying different information in the document window status bar - The status bar displays the document file size by default. The file size is shown as two numbers separated by a forward slash: the first number is an approximation of the image file size with all layers merged (known as "flattening" the image), and the second number is an approximation of the total file size of the image with layers intact. If all this sounds new to you, don't worry. We will be discussing layers shortly. You can set the status bar to display different information, such as the document dimension in pixels, or the version number of the file. To do this, click on the arrow icon next to the status bar, select Show and choose the information you'd like to see.
C) Saving your Customized Workspace As you become more proficient with Photoshop, you may discover that you use certain sets of palettes for different types of projects, and that there are some palettes that you don't use at all. Photoshop allows you to save and load different workspaces with different arrangements of palettes, menus, and even different keyboard shortcuts. It will help you work more efficiently. 
After you've customized your workspace to your satisfaction, select the Workspace menu in the options bar, click Save Workspace and enter a name for your workspace, such as Creating Thumbnails or My Default Workspace. You can then load your different workspaces by opening Workspace and selecting your custom workspace from the menu list. |


No comments:
Post a Comment